Sunday, March 22, 2020

DIY fabric facemask/surgical mask

Hi there!

Here's the pattern I modified as promised.  Please refer to the YouTube video for the step by step instructions for this mask.

***THIS MASK IS NOT A CDC APPROVED FILTER FOR COVID-19. This mask IS better than nothing and what I'll be wearing at work. I am still working on what the actual filter for this mask will be.


View the tutorial on YouTube here.

I am still trying to work on a PDF upload. Here is a JPEG for now.  Click on the picture for a full sized view that you can print. This is scanned as 8.5x11".


Here's the YouTube video I created the pattern from. I modified the overall design from this base design.

Saturday, October 26, 2019

Alcohol ink swirl tumbler tutorial

This is a VERY short and sweet run down of how to do an alcohol ink swirl tumbler. Check out my YouTube video for an actual step by step and visual! I'll post the link at the bottom.

You'll need:
  • Epoxy (make sure it is FDA rated) 
  • A prepped cup base painted in the color of your choice. White tends to make colors pop.
  • A way of turning your tumbler
  • A heat gun/embossing gun 
  • Gloves and other personal protection such as a mask 

This is the tumbler I made a few weeks ago that was used as inspiration for this tutorial.


*First, mix your epoxy thoroughly. I used 30 ml and had a little over 7 ml remaining for this 20 ounce tumbler.

*Spread the epoxy over the cup making sure to get the bottom covered as well. Allow it to spin a couple of minutes so that you can make sure that all the cup has been covered. This also allows it to level out better before getting started.

*Drop your inks onto the epoxy. Careful not to do too many darker colors unless you want it to end up darker. They will blend and look black.  To get more vivid colors, I like to drop white into the center of a lot of the colors.


*Allow this to turn for several minutes.
*Remove the arm holding your tumbler because we are about to get movin'! 


You'll tilt the cup vertical both directions and diagonal to force the epoxy/inks to move around. You'll want to make sure you're working over a protected surface for this since it can get messy!


***I DID NOT COME UP WITH THIS TECHNIQUE!***
I believe the hashtag #aleeseyamethod is what I found and watched.  This is a variation of her technique since she drops white in a different way.

*Put the arm back on the turner and allow it to continue turning until cured.  Sometimes I will use my embossing gun to make the epoxy runny and allow extra movement.  I have done that in the video.

For a complete visual step by step, take a peek at the YouTube video I just posted HERE!

Thanks for reading and I hope you take a few minutes to watch the tutorial (23 minutes to be exact).  Drop me a note below if you have questions or feedback!

Sunday, August 19, 2018

Our first CHICKEN adventure!!!

Y'ALL.                                                       

I've been wanting chickens for FOR-EV-ER.  Literally.  I created a Pinterest board  a few years ago and have slowly been adding cool ideas to it.

Well, today it happened.  The 2nd anniversary of buying our home that so conveniently sits on 2.5 acres.  2.5 acres that are practically screaming for livestock.  Can't you hear it??

I had seen the Facebook ads for Tractor Supply's "chick event" and saw the billboard above the Argyle Feed Store.  I even shared the ad and tagged hubby.  A not-so-subtle hint.  He.  Didn't. Even. See.  It.

Seriously?

After I pointed this out out him over breakfast, we moseyed into TSCo before getting groceries this morning.  How convenient that it was only 2 blocks away.

Let me just tell you...it was love at first sight.  I fell in love with the chickies.  Hubs fell in love with the ducklings. Not exactly the box of chicken that the kids would've ever imagined we would be bringing home!


All of a sudden, we had to figure out how we could keep them until we could build the coop that we thought we had all the time in the world to build.  You know, you always think there are no time restraints when you don't actually have anything to put in it.  We're in the process of converting a 10' x 10' dog kennel into the Taj Mahal of chicken coops.  Luckily, we have a couple of weeks before the chicks are ready to be moved out there.  I'll be posting the progress of that as we go along. This definitely lit the fire to get that project moving.

For the moment we modified a collapsible dog crate to make their "temporary housing".  Hubby just wrapped the chicken wire we had around the crate and a separate piece on the door.  We are supporting the heat lamp with the clamp and additional paracord to keep it up high for extra precaution.  The bedding gets kicked out the sides fairly easily, but we just sweep it up and drop it back in.

We might need a little help and inspiration to name ALL of the babies.  So far we have named:     

Midnight and Sunshine

Stone


Butter

Penguin (she looks like Mumble!)


Oreo (I have to confess that she's my favorite)

There will be a Belina once I figure out which yellow one I want to name that.  If you have any great clever names, I would love to hear them!

Stay tuned for progress on their growth and the coop conversion.  Maybe even some posts about piggies and goats in the future.


Tuesday, May 9, 2017

My very first makeup tutorial!

I'm no make up connoisseur by any stretch of the imagination.  In fact, my make up regimen was made up of mascara and eyeliner most days for practically my whole adult life.

Until almost a year ago.

I have a coworker who LOVES makeup and always has always had BEAUTIFUL eyeshadow.  I oooh'd and ahhh'd practically daily.  Out of the blue one day, she said that I NEEDED to go buy the new Alice Through the Looking Glass pallet that Urban Decay had just released. Me, that chick she's worked with every single day for 6 years and had only seen with eyeshadow for special occasions.  Me, the chick that SHE had to put the eyeshadow on for.  I seriously had no clue how to make it a pretty and kinda artsy expression.

My 6 year anniversary was coming up, so we knew that there'd be a $50 bonus coming.  I set aside a little more. I looked it up, $50 wasn't going to cover it!  **GULP**  The most I had ever paid for eyeshadow was around $4 for Covergirl....this was HUGE.

Ulta brand nude matte eye primer -Check

Alice Through the Looking Glass pallet -Check

Checkout -gulp-Check

Here's what I bought...well, Googled images of what I bought:


A majority of the tuts I found on Pinterest for this pallet were so bright and really not my style.  I was already stepping out on a ledge with this, I didn't want to actually go to work looking the The Hatter!  I have 3 go-to color combos that I can use no matter what I am wearing.  Every great once in a while, I'll toss in another color just to spice it up.  But really, I stick to 3.

It was strange getting the hang of applying the primer.  As easy as it seemed (and really is), it took me a couple of attempts to not get too much on the lid that it practically looked like paint.  I use an amount equal to about half a grain of rice.  I dab it around and then blend it in.

I already had a few basic brushes from E.L.F. from past attempts at adulting.  It was nice to finally get some use from them!  I start out with the TIME eyeshadow in the top right corner.  I used the E.L.F. concealer brush to create an eyeliner look on the bottom lid.


You're about to see what is probably the opposite of most make up tutorials in the next couple of steps.  It seemed that the majority of the tuts instructed to started at the inner lid and work out with the colors.  Maybe this is the norm, or maybe that was just the few that I looked up.  Again, NOT an expert.  Not even close.  I finally discovered that I get an easier blended look going the other direction. So, here I go.  I apply TIME again to the outer corner and angle it upwards to make a good sized triangle.

Next is BANDERSNATCH for about another 1/3 of the lid.  I tend to go pretty high up on the lid, my eyes open pretty wide and makes the shadow not visible.  Plus, behind glasses it is harder to see as well.

And then for the pop of color, I really love HEADS WILL ROLL.  This is the main color that Shannon decided I needed.  I think the rest of the pallet was just a bonus!


That's it for the eyeshadow.  Next is my mascara.  I've tried the cheap stuff.  I've tried the $25 per tube brands.  I finally landed on a drugstore brand that I buy with my groceries....gasp.  I load up on primer.  And then load up again.


It's funny and embarrassing when I forget that I've only made it through the primer part of the process and I run for donuts.  Or go in and pay for gas.  Confession: I usually do my makeup in the car. I do most of it by feel and then just check for bad spots at the red lights or when I get caught at a train. I've had a few odd side glances here and there.  OOPS!


After this dries pretty well. I cover it all up with the actual mascara.  I usually do 2 to 3 applications.  My lashes are fairly hopeless in the "robustness" category, so I don't think more than that would even accomplish anything.  Sometimes there's a touchup to do.  Like here I had to gently wipe off the brush marks.  Again, I do the car application method and it doesn't always work out in my favor. 


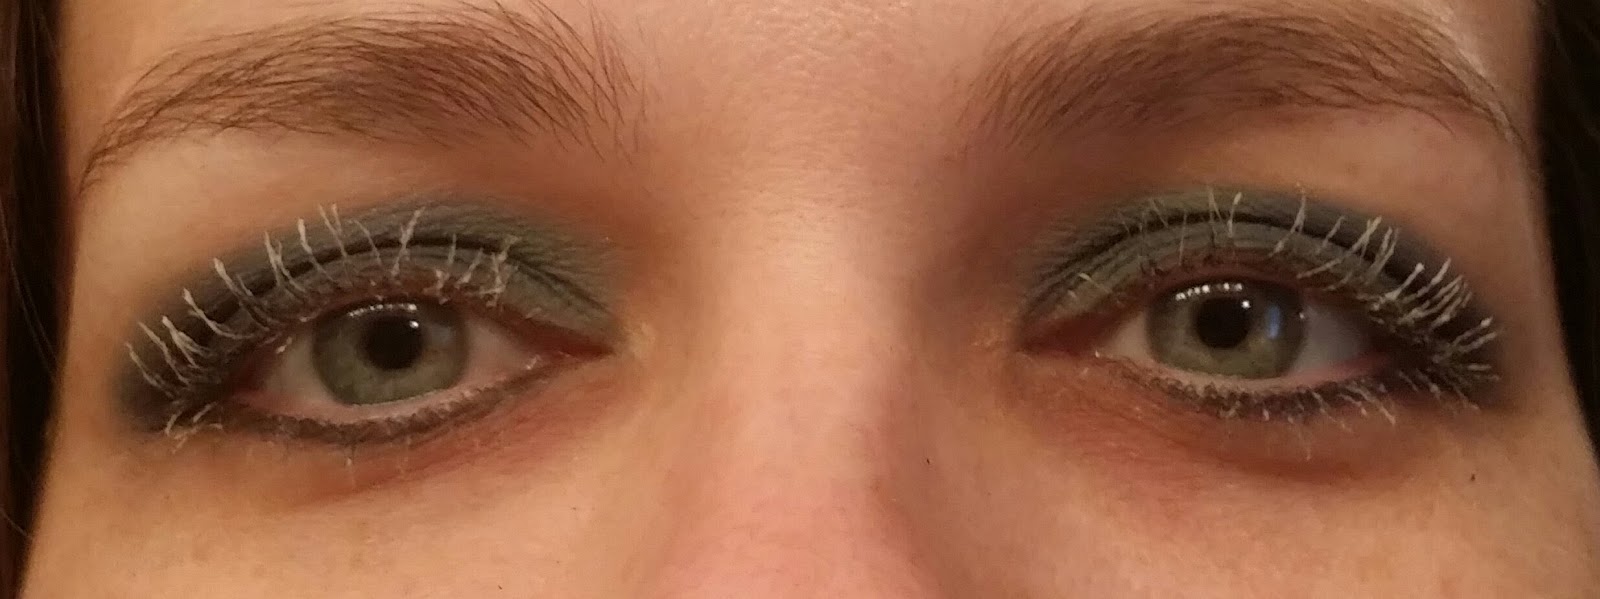
My final note of wisdom that I recently stumbled upon:  PRIMER.  Don't even try to do anything without primer!!!  I forgot it one day, only one, and I learned my lesson really fast!  The shadow applies and stays like magic.  Here I am 9 hours later on my way home from work.  Somewhat smudgey in a few spots, but overall still looking pretty close to original 8 am application!


I mentioned earlier that I usually use one of 3 main combinations.  Here they are:
#1 Heads will roll, Bandersnatch, Time
#2 Metamorphosis (or Hatter), Gone Mad, Time
#3 Hatter, Bandersnatch, Time

Today was Hatter, Gone Mad, and Time.  This is 13 hours after application, so excuse the lack of bold colors.  Especially on a dreary day in Texas that my allergies are killing me!


I know this pallet was a limited edition.  According to one blog I read, UD released 20 all new shades for it rather than renaming a collection of existing shades.  I picked out my fave colors and matched them fairly closely to the current line up shown on the Urban Decay website. The current collections are constantly changing with the seasons, but here's the eyeshadow link as of today. 

TIME - Smokeout
HEADS WILL ROLL - Peace
BANDERSNATCH - Evidence (not quite as dark)
GONE MAD - Vice
HATTER - Deep End isn't even close, but is the only bright green
METAMORPHOSIS - Dive Bar looks darker, but Chaos looks brighter.

I definitely feel that the amount of pigment in the higher end shadows helps make the added expense a little easier to bear.  I added one color to my collection, its a white sparkle that I think is called Vinyl Bride.  I don't use it often, so that $19 will last quite a while.  I've been working the same colors of this pallet for over 11 months, you can hardly tell it.  See for yourself!  This was taken about a week ago:


Hopefully this will help a few "newbies" such as myself get a grasp on a simple approach to "fancy" makeup!  Please leave a comment if you have a question or just to say hi!

Tuesday, March 28, 2017

What brand?

Wow.
I never realized my mind could be blown so frequently.

Has anyone ever had to decide on a new logo and business card design? I had no idea that getting serious about my branding would be so hard. For so many years I have just tossed together what I could manage in paint or whatever program I had on the computer at the time. Once, I won a logo design from a Facebook giveaway. This was YEARS ago when I was building my Facebook page. It was surely better than what I'd had before, but pretty primitive so to speak. Then I decided to make labels for the first time and had to have a logo that was something I was proud of. So I whipped one up. NOT the best looking, but I felt like it was pretty decent.


Later on, I changed my shop name to The Purple Stitch. This is a nod to the color that represents the Alzheimer's fight, mixed with what my shop is about....stitching stuff.

And another modification later on:


I've been listening to Christy Wright's Business Boutique podcasts lately. I've preordered the book. I drank the juice. Now implementing those incredible tidbits of advice bit by bit is a little harder than I expected.  I made myself a list of all the things in life I needed to get done.  Then rewrote that list as things were done and crossed off...and of course, more stuff added to it.  I swear that every podcast I listen to, I pick up something else that I need to look into or think about.  If you're a small business boutique, you should seriously look at her website and listen to the podcasts.  Since that's not really what this post is about, lets get back to it.

Now it's time to get really intentional about the logo.  Something classy, but eye catching.  Simple, yet stunning.  I ordered new labels a few weeks ago from MommieMadeIt on Etsy and fell in love with one of her premade designs.


That really got my gears moving on how I could really make an impression with consistent logos in all the places I have my brand.  Looking back on the evolution of the logos kinda makes me feel like I'm looking at my kids growing up.  Cheesy, I know. 

If you have any suggestions for others on branding, or have a great resource, feel free to share that in the comments!

Sunday, March 5, 2017

It's gettin' real

I've been making replacement covers for a certain type of booster seat for many years. Probably since about 2012 I'd say. I've sold lots on Etsy and a few at craft fairs. At first I was the only shop that made custom fitted. Now, I see several so it has slowed down a good bit. That's ok, God has His hand on everything even when we don't see it. A sale seemed to come when we needed just a teensie bit more cash to make it to payday.

This summer I put my shop on vacation as we were packing, moving, and settling in to our new home. I hadn't put much effort into trying to boost sales again. A late night decision to start a new online craft sale Facebook group ended up in a conversation with a scrapbook friend about the opportunity to really do more. She informed me that she had a friend that owned a local kids resale shop and had recently told her about the covers I make. I called and set up a time to meet her to see if it was a fit and what she needed. The store owner LOVED them and she placed a starter order of 10 seat sets!!

I can't wait to see what God has in store for my little business and to see how it grows and continues to transform! As of now, not only do I already have a booth space at a local antiques and more shop, I have my creations in 2 local retail stores. I'm also looking into 2 more opportunities. Oh my gosh, I would've NEVER imagined so much possibility a few years ago!

GOD is GOOD!

First 4 of the 10
If you are looking for a group to find the perfect something or showcase your handmade crafts/gifts/etc, please check out the group here, as it will someday be THE best place to find what you're looking for!

Sunday, January 1, 2017

My latest project...the "envelope system" wallet

Just a few weeks ago I made myself a radical, tubulartotally awesome, any other 80's or 90's phrase of appreciation, wallet to keep me organized in our journey down the Dave Ramsey baby steps.  If you aren't  familiar with his teachings, it helps all of this make sense to know that he recommends paying cash for pretty much everything.  Paying with cash instead of cards triggers the pain receptors in our brain and causes an emotional response to buying something.  It's a lot harder to let go of cash knowing you won't get it back than handing over a card that will go right back in your pocket.  Obviously some expenses require an auto draft or debit card, but generally speaking cash is used for all the other purchases like gas, groceries, copays, and other feasible expenses.  It can get kinda difficult juggling an envelope for each category and eventually the envelopes get worn out and tattered. Like these that I am still using for the kids' money.  They also doubled as their Christmas list of who they wanted to buy for.


I decided that I needed something that I would be excited to carry...so I went digging through my fabric stash determined to find what I needed without spending any money on it.  I came close to accomplishing that!  I stumbled across the Wonder Woman print at Walmart in the fat quarters bin for $1.47. I was planning on covering it with Super Mario, but that made 2nd place and became the inside print.  I decided a little iron-on vinyl would keep it clean and durable longer and some stiffener would help give it shape and stability.  All in all I spent about $4 on those 3 pieces.  I couldn't resist embroidering the envelope designations just to really make it my own.  You can really tell that I was born in the late 70's by the eclectic combo of 60/70's movies & tv shows, 80's and 90's cartoons, and the overall vibe of it.  I get compliments on it everywhere I pull it out to make payment!  So often, that I am actually working out a few technique issues and will likely be listing them in my Etsy shop!

In a future post, I'll be doing a step by step of how I do the envelopes.  But for this post, I'm just dropping a teaser!

The outer layer is covered with iron-on glossy vinyl.  With as much love this wallet will get, I definitely wanted to boost the durability for the long haul.


I added a little pocket kinda last minute.  I stash any receipts in there until I'm ready to toss them.


Each category represents what we use the most.  Other purchases (like my car inspection) are coming out of the "misc expenses" envelope as needed.


I threw in a blank one because I knew something would come up that I'd wish I had an extra.  For now, I use it for the worn out envelopes with the kids' cash in it.  I plan to make them a legit envelope at some point.


And of course, I needed a coin pocket so I can make exact change when possible.  I used snaps in this one since it pretty much gets folded up snug enough that the coins won't fall out.  I didn't have Velcro handy and didn't want to make a special trip or spend the money on that.  I made due with some coordinating snaps I already had from some other past projects.


Just before closing up the final opening, I added a loop of ribbon for a pen.  I'm glad I did!  It has already come in handy to make notes on receipts or document something I needed to deduct from the budgeting app we use. Even with cash, I keep account of where it all goes.  It's so easy to see where our money goes, and it's freeeee!


A couple of gals at work ooh'd and ahhh'd and not-quite-sublty told me that I needed to make another for them to buy.  It just so happed that one of their birthdays is so close, and I can't justify spending the money on a little something (like I had been doing for the other recent birthdays).  I added a few features to hers that I didn't think of the first time around.  After I'd finished up the wallet I made for my coworker, I decided that I couldn't live with out one of the bonus features!  You'll see all of that in a later post (her birthday is next week, so hang tight!) and it just seems like it is gonna be so dang handy.  I made sure to go ahead and take tons of pictures, partially for the future post and partially for me to kind of create a catalog of sorts of options. 

I really hope you enjoyed the breakdown of the design.  Depending on demand, I can do a step by step of how I made each add-on.  This was loosely based on this great tutorial that I found on Pintrest. I modified the sizing a good bit, and then even more when I made the second wallet.  If you need measurements, just drop a comment.  I've decided that anymore wallets I make will have a wider wallet part.  It was really hard to sew it up with the bulk of the envelopes.  That may have been because I added the stabilizer in each envelope.  I'll find out when I make the next one.

Happy NEW YEAR!!